
Why DIY Water Leak Detection Matters
Hidden Costs of Undetected Leaks
Water leaks that go unnoticed tend to hit wallets pretty hard, driving up monthly bills while slowly eating away at property through hidden damage. Take something as small as a leaky tap – what seems harmless actually wastes hundreds or even thousands of liters every month. Industry data shows that fixing serious plumbing problems costs homeowners anywhere between several hundred bucks right up into the thousands when things get really bad. And let's not forget about the bigger picture. Houses with past water issues struggle to sell because most people steer clear of properties where mold growth has become part of the story.
Preventing Structural Damage
Those little water leaks nobody notices can actually wreck havoc on a building over time, especially when they start messing with things like the foundation, walls, or roof area. When water gets inside, it does all sorts of damage - warps the wooden parts, eats away at drywall, and weakens those important support beams that hold everything together. The whole place becomes unstable and dangerous if left unchecked. Most building codes these days stress checking for leaks regularly as part of basic maintenance. Fixing them early saves money in the long run and keeps the place looking good while maintaining its structural strength. Nobody wants their home or business collapsing because someone ignored a small drip problem years ago.
Health Risks from Mold Growth
When water leaks go unchecked, they create perfect conditions for mold to grow, which can lead to all sorts of health problems like breathing difficulties and allergic reactions. Mold really loves damp spots and will start spreading within just a day or two after getting wet. The Centers for Disease Control has reported that many homes actually have some kind of mold issue, making it clear why fixing water problems fast matters so much. Homeowners should take steps to stop mold before it starts - keeping humidity down below 50% helps a lot, and fixing those dripping pipes right away instead of waiting until it becomes a bigger mess. These simple actions not only protect everyone's health but also save money in the long run by avoiding costly repairs later on.
Essential Tools for Pipeline Leak Detection
Basic Household Items for Initial Checks
Pipeline leaks don't always announce themselves loudly, but some everyday stuff around the house might just catch those early warning signs before things get bad. Towels, plastic sheeting, and old buckets? Believe it or not, they work wonders when dealing with small leaks or damp spots. Lay down some towels near walls or under appliances if there's a suspicion of moisture building up somewhere. Those plastic sheets make great barriers too, stopping water from spreading all over the floor. And nobody wants to deal with a sudden flood, so having a couple of buckets nearby makes sense for catching drips until proper repairs happen. Keep an eye on these items regularly, maybe even set aside a specific spot for them near potential problem areas. A little preparation goes a long way toward avoiding major headaches later on.
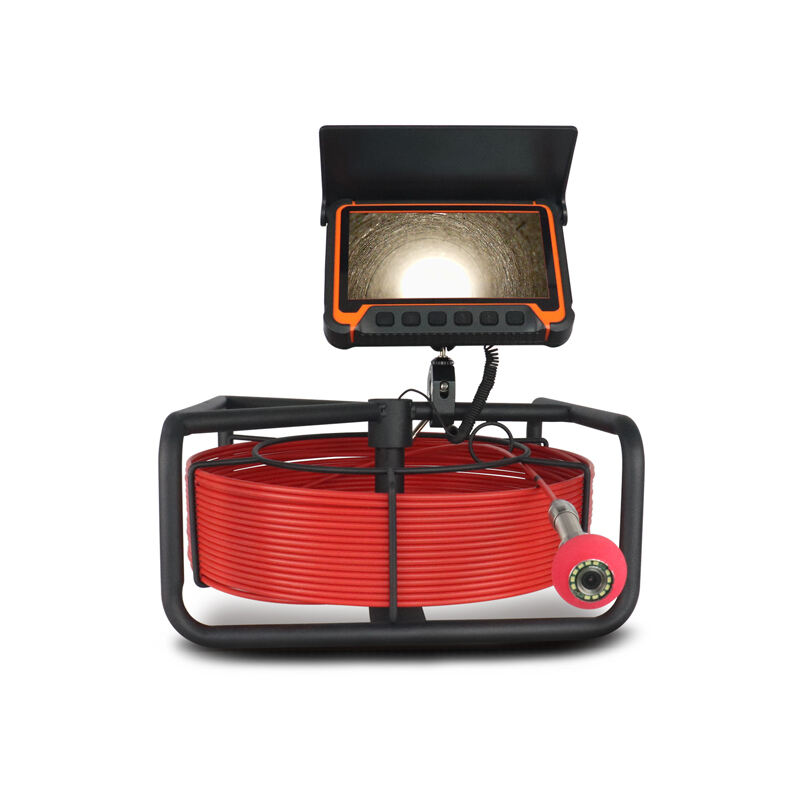
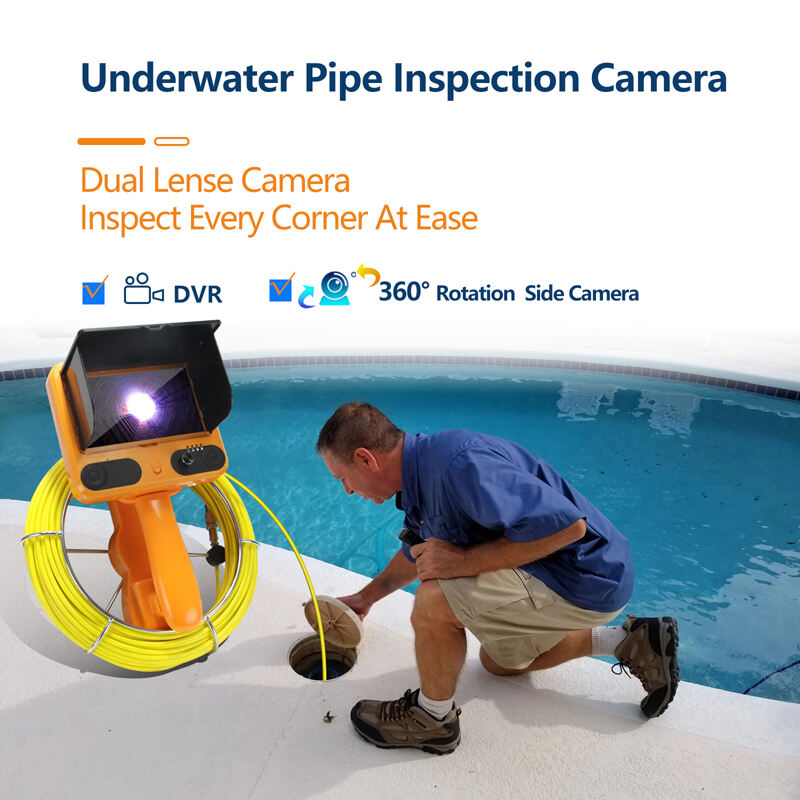
Using Plumbing Cameras for Hidden Leaks
Plumbing inspection cameras really changed how we find those pesky leaks hiding behind walls or buried underground. These handy gadgets let plumbers look inside pipes without tearing things apart, giving live video so they can see exactly what's going on. Traditional snake inspections just don't cut it anymore when there's something subtle wrong deep in the system. Picking out the right camera matters a lot too. Some jobs require longer cables for deeper runs while others need better image quality to spot small cracks or corrosion. Getting the specs right means finding problems before they turn into major headaches down the road, saving both time and money in repairs later on. Of course, no tool works perfectly every time, but having good equipment definitely makes all the difference in tricky situations.
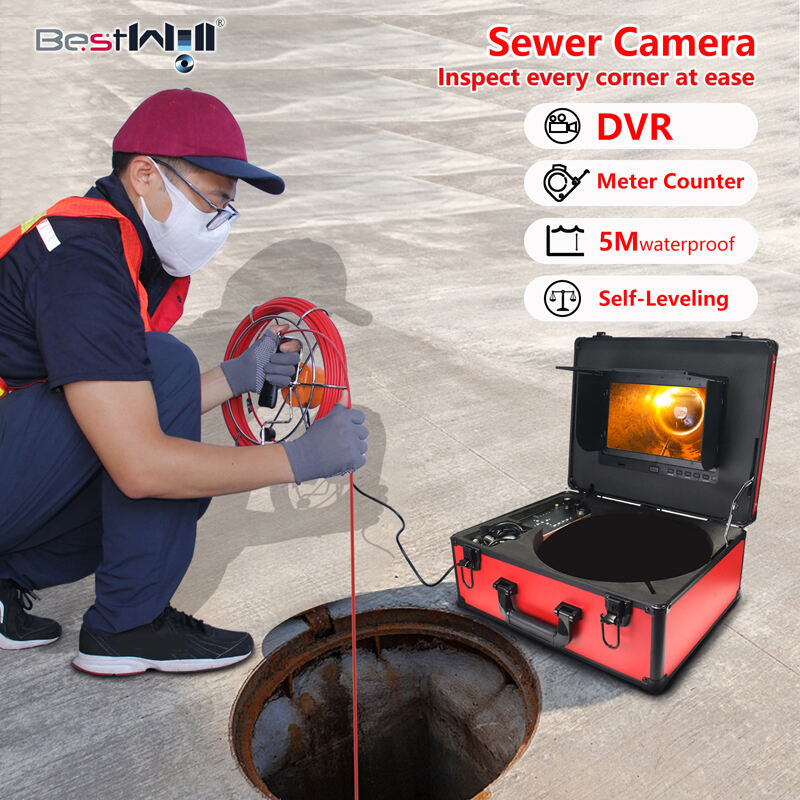
Sewer Inspection Camera Basics
Sewer inspection cameras have become really useful in home plumbing work, giving people a good look inside their sewer lines. Most models come with special features aimed at finding blockages and leaks before they get worse, which helps avoid bigger plumbing headaches down the road. When problems are caught early on, homeowners save money on expensive fixes later. Take those annoying slow drains or frequent backups everyone deals with sometimes these cameras actually show what's going on underneath all that pipe work. Getting ahead of these issues makes sense for extending how long the whole system lasts while keeping stress levels lower for anyone dealing with household maintenance tasks.
Drain Camera Positioning Techniques
Getting the right position for drain cameras makes all the difference when trying to capture clear footage during inspections. Before starting any work, knowing how the plumbing system actually looks underneath everything else really matters. This kind of knowledge lets technicians move the camera around properly inside those pipes without getting stuck somewhere unexpected. A good approach usually starts at the main drain line first then works its way into smaller branches one by one. Many people forget about those tricky bends and blockages along the way which just ends up wasting time and money on repeat inspections. When cameras are placed carefully though, they tend to spot problems early on before they turn into major headaches down the road that require expensive fixes later.
Step-by-Step DIY Leak Identification
Water Meter Test Methodology

Testing the water meter remains one of those easy ways to spot hidden leaks around the house. First thing's first turn everything off that uses water so nothing runs through the pipes. Take a look at what the meter reads right now. If it moves even just a little bit after everything's shut down, chances are good there's a leak somewhere. Want to be sure? Give it about an hour or two without touching anything connected to water, then check back. Any difference means we've got a problem on our hands. A neighbor once told me how doing exactly this saved their wallet big time when they caught a small leak before it turned into something expensive. The whole process isn't complicated at all and gives folks reassurance knowing about possible problems long before they become major headaches.
Visual Inspection Hotspots
Regular visual checks in places where leaks tend to happen make all the difference when it comes to catching issues before they become disasters. Look out for trouble spots underneath kitchen sinks, near those old water heaters gathering dust in corners, and definitely behind big appliances such as washers and dryers. Many folks find it helpful to grab a printed list or download one online that guides them through each potential problem area step by step. Finding small drips or damp patches early on stops major water damage from happening, which means saving hundreds if not thousands on repairs later down the road while preserving the overall condition of the house. Making time for these routine spot checks every few months ensures that minor issues get fixed fast instead of turning into expensive headaches for property owners.
Outdoor Pipe and Foundation Checks
Checking outdoor plumbing lines and looking around foundation walls for leaks helps stop bigger problems down the road. Homeowners should watch out for damp spots on driveways or sidewalks, plus those weird patches of lush green grass growing when nothing else will survive there. These little clues often point to hidden water leaks beneath the surface. Most people forget about their underground pipes until something goes wrong, but regular looks around property boundaries actually cuts down on big repair bills later on. A good rule of thumb is to walk the perimeter twice a year, maybe once in spring after all that winter snow melts away. Catching small drips early means fixing them costs just a fraction of what full blown foundation damage would run. We've seen too many houses where a tiny pipe crack turned into tens of thousands in fixes because nobody bothered to check until it was way too late.
Interpreting Unusual Water Usage Patterns
Keeping an eye on water usage patterns gives homeowners a way to spot possible leaks before they become major problems. When there are sudden jumps in water use that don't match what's normal for the household, this often means there's something wrong somewhere in the plumbing system. Most local water companies now have online tools where customers can check their usage history month by month. Getting familiar with what counts as regular activity for one's own home makes it much easier to notice when things start looking off. Once people learn to read their water bills and understand what different numbers mean, they tend to catch issues faster and fix them sooner rather than later. The bonus here is twofold really water savings happen automatically while at the same time helping protect our precious resources for everyone else too.
Temporary Fixes Using Household Solutions
Epoxy Putty for Small Pipe Cracks
Epoxy putty works pretty well as a stopgap fix when dealing with those little cracks in pipes. First things first though, get that damaged spot really clean. Dry it off completely and sweep away all the dirt and gunk that's built up there. Take a chunk of putty from the package, then work it between your hands until it turns into one consistent color throughout. When ready, press this stuff firmly onto the crack, making sure to smooth it down so there are no gaps or bubbles. Let it set according to what the packaging says for best results. While epoxy putty definitely makes life easier for quick fixes, remember it won't last forever. Also important: always do this repair job somewhere with good airflow and don't forget gloves. Some people find their skin reacts badly to epoxy materials, especially if they have sensitive skin or allergies.
Pipe Clamp Installation Guide
Putting on a pipe clamp isn't complicated at all and will stop most leaks dead in their tracks until someone gets around to fixing them properly. First thing's first though find where exactly water is coming out of the pipe. Got it? Now slap that clamp right over the spot where things are dripping. Give it a good tighten on either side so it sits snug against the pipe. Pipe clamps come in all shapes and sizes really. Some work better for copper pipes, others for plastic ones. Know what kind of pipe you're dealing with before picking one up from the hardware store. Most stores have diagrams showing how different clamps should go on various pipe types. These visuals help a lot when trying to get everything just right. Using these guides means no more guessing games and less water damage while waiting for professional repair.
When to Use Rubber Sealant Tape
Rubber sealant tape comes in handy for fixing those pesky leaks in pipes temporarily. The stuff stays put because it's so flexible and easy to work with. Wrap it snug around where the leak is happening, making sure each layer overlaps the previous one for good coverage. Works on almost anything it touches and keeps bending without breaking, which makes it great for pipes that aren't straight or round. What really stands out about this tape? It holds up under pressure surprisingly well. Before putting it on though, wipe down the pipe surface until it's completely dry otherwise it won't stick properly. And don't go overboard wrapping it either tight or multiple times since that could actually block off water flow somewhere else. Give it a try next time there's an emergency leak situation at home or workshop.
Advanced Leak Confirmation Methods
Sewer Camera and Locator Integration
When plumbers combine sewer cameras with locator tools, they get much better results finding leaks in pipes. The combo gives them both what they see inside the pipes and where exactly those problems are located. This makes all the difference when dealing with tricky plumbing jobs that regular methods just can't handle. Think about trying to find a leak under a concrete driveway or deep inside an old drainage system that nobody wants to dig up. With these tools working together, technicians save time and money because they don't have to tear things apart blindly anymore.
When it comes down to real world applications, this technology really makes a difference when finding problems in underground pipes without having to dig everywhere. Take one situation where plumbers found and fixed a water leak beneath a busy parking area in just a few hours instead of spending days tearing up asphalt. They saved thousands on repair bills and kept traffic flowing normally during business hours. What's even better is that these kinds of fixes prevent bigger headaches later on, since small leaks can turn into major infrastructure failures if left alone too long. The savings aren't just financial either – less digging means fewer complaints from customers about disrupted daily routines.
Pressure Testing Suspected Pipelines
Testing for pressure remains one of the main ways plumbers find leaks when they suspect problems in pipelines. Basically what happens is workers seal off part of the pipe system then pump either water or compressed air inside to create pressure. When there's a drop in pressure reading on those little dial meters everyone carries around, that usually means somewhere along the line there's a leak. Most experienced technicians will tell anyone who asks that regular pressure checks should be part of normal maintenance schedules. Catching small issues before they become big headaches saves money and prevents all sorts of mess down the road.
Doing regular pressure tests helps pipes last much longer than they otherwise would. When technicians spot weak spots or small leaks early on, it keeps the whole system intact and saves money down the road. Think about all those repair bills that get avoided just because someone caught an issue while it was still manageable. The numbers really add up over years of operation. But here's the thing nobody mentions enough: following the maker's instructions matters a lot. Using properly calibrated gear isn't optional if we want reliable readings. Safety comes first after all, and nobody wants accidents caused by faulty test equipment giving false readings.
Thermal Imaging for Wall Penetrations
Thermal imaging has proven itself as something really useful when it comes to finding leaks inside walls or behind other surfaces, all while keeping things intact. Basically, what happens here is that the tech spots temperature variations which indicate where moisture might be hanging around, so we can find those sneaky leaks that nobody can see with just their eyes. One big plus about this approach? It doesn't mess with the structure at all. Contractors can run checks fast without tearing apart drywall or flooring, which saves time and money on repairs down the road.
Thermal imaging gets a lot of kudos from industry pros for catching leaks quickly and accurately. Take a look at recent findings published in the Journal of Building Systems - researchers there found that thermal cameras spot those sneaky hidden leaks that standard inspection techniques often overlook. What makes this tech stand out? It gives inspectors a whole new view of what's going on inside walls and ceilings without tearing things apart. Homeowners love it because it saves time and money compared to old school methods that require guesswork. Professionals appreciate the reliability factor too, since no one wants to come back multiple times after missing something obvious. Basically, thermal imaging has become a game changer in how we approach water damage prevention today.